
插件管理|Plugin
插件功能介紹 | Plugin Features
插件(Plugin)是系統與外部服務或內部 API 之間的橋樑。
透過設定插件,可讓系統調用外部資料、執行特定功能,或整合第三方應用程式。
插件的主要功能包含:
• API 整合:可快速串接外部服務,如查詢資料、提交任務或觸發流程。
• 資料處理:搭配 JQ 工具,能過濾或精簡 API 回傳結果,使資料更符合實際需求。
• 權限控制:可設定 API 驗證(如 Token)以確保資料安全性。
A plugin serves as a bridge between the system and external services or internal APIs.
By configuring a plugin, the system can access external data, execute specific functions, or integrate with third-party applications.
The main functions of a plugin include:
• API Integration: Quickly connect to external services, such as querying data, submitting tasks, or triggering workflows.
• Data Processing: Use JQ tools to filter or refine API responses, making the data more aligned with actual needs.
• Permission Control: Set up API authentication (e.g., Tokens) to ensure data security.
A. 插件建立 | Plugin Creation
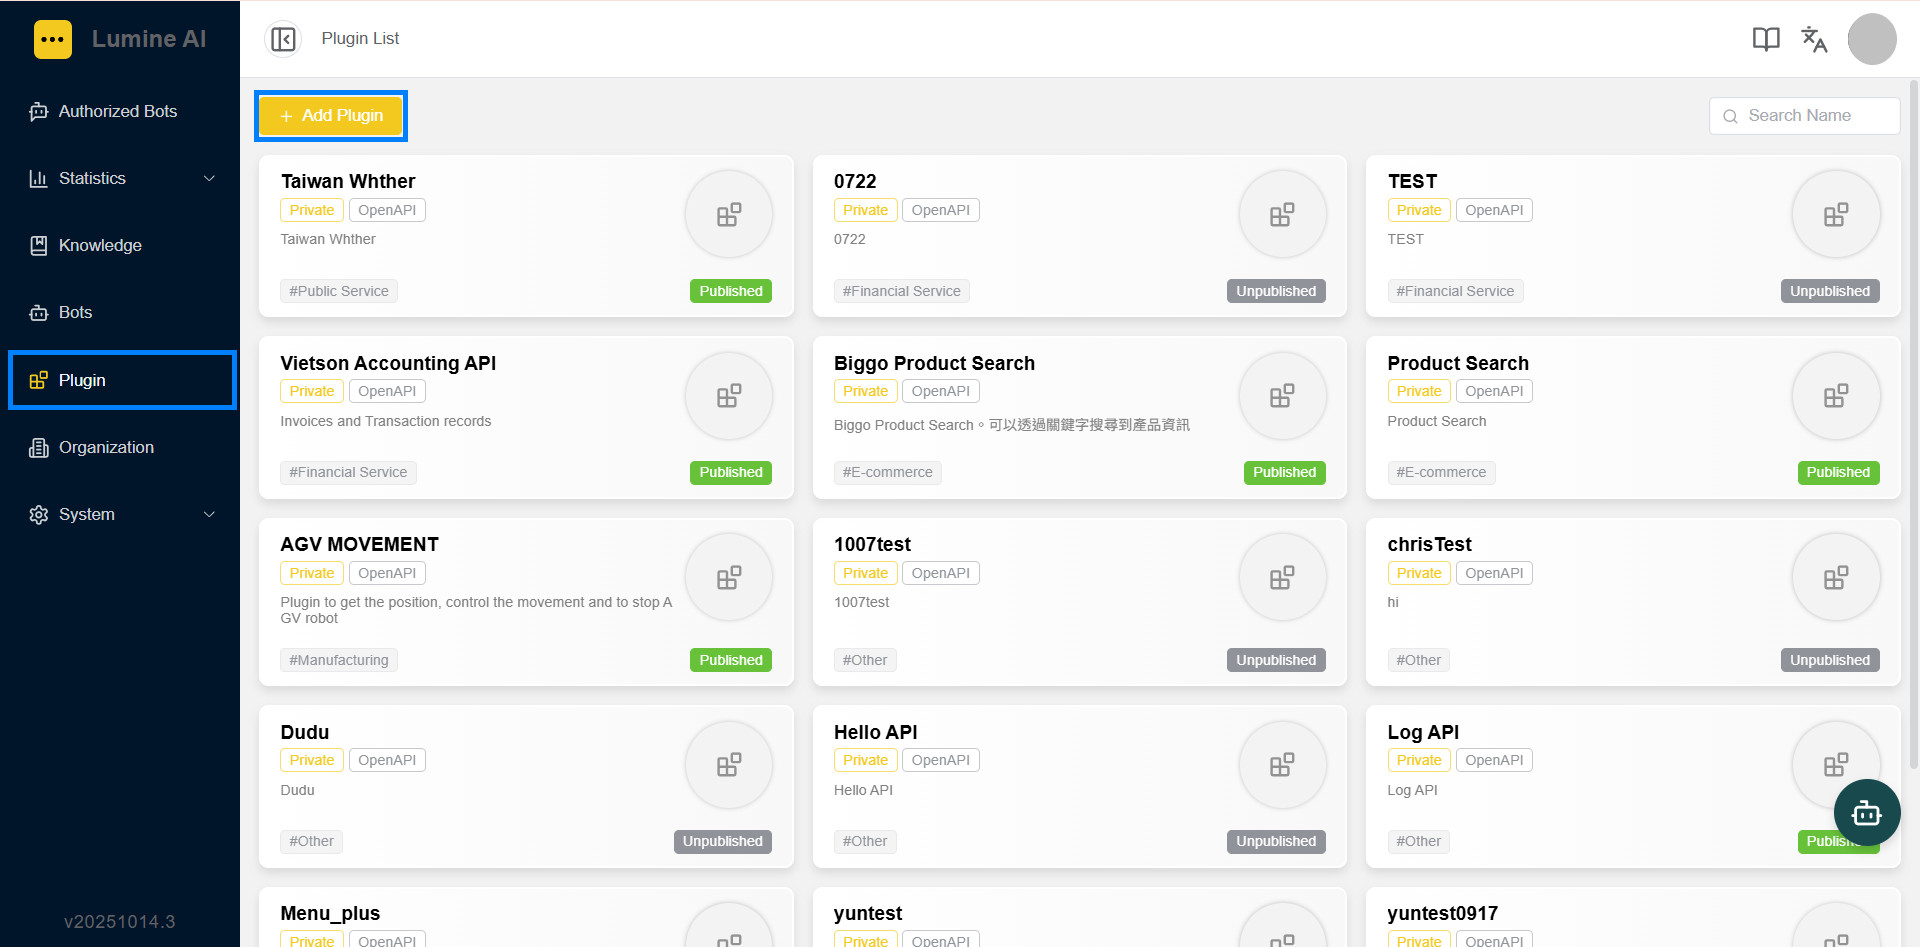
1. 進入插件管理介面後,點擊「新增插件」按鈕開始建立。
Enter the plugin management interface and click the "Add Plugin" button to start creating a plugin.
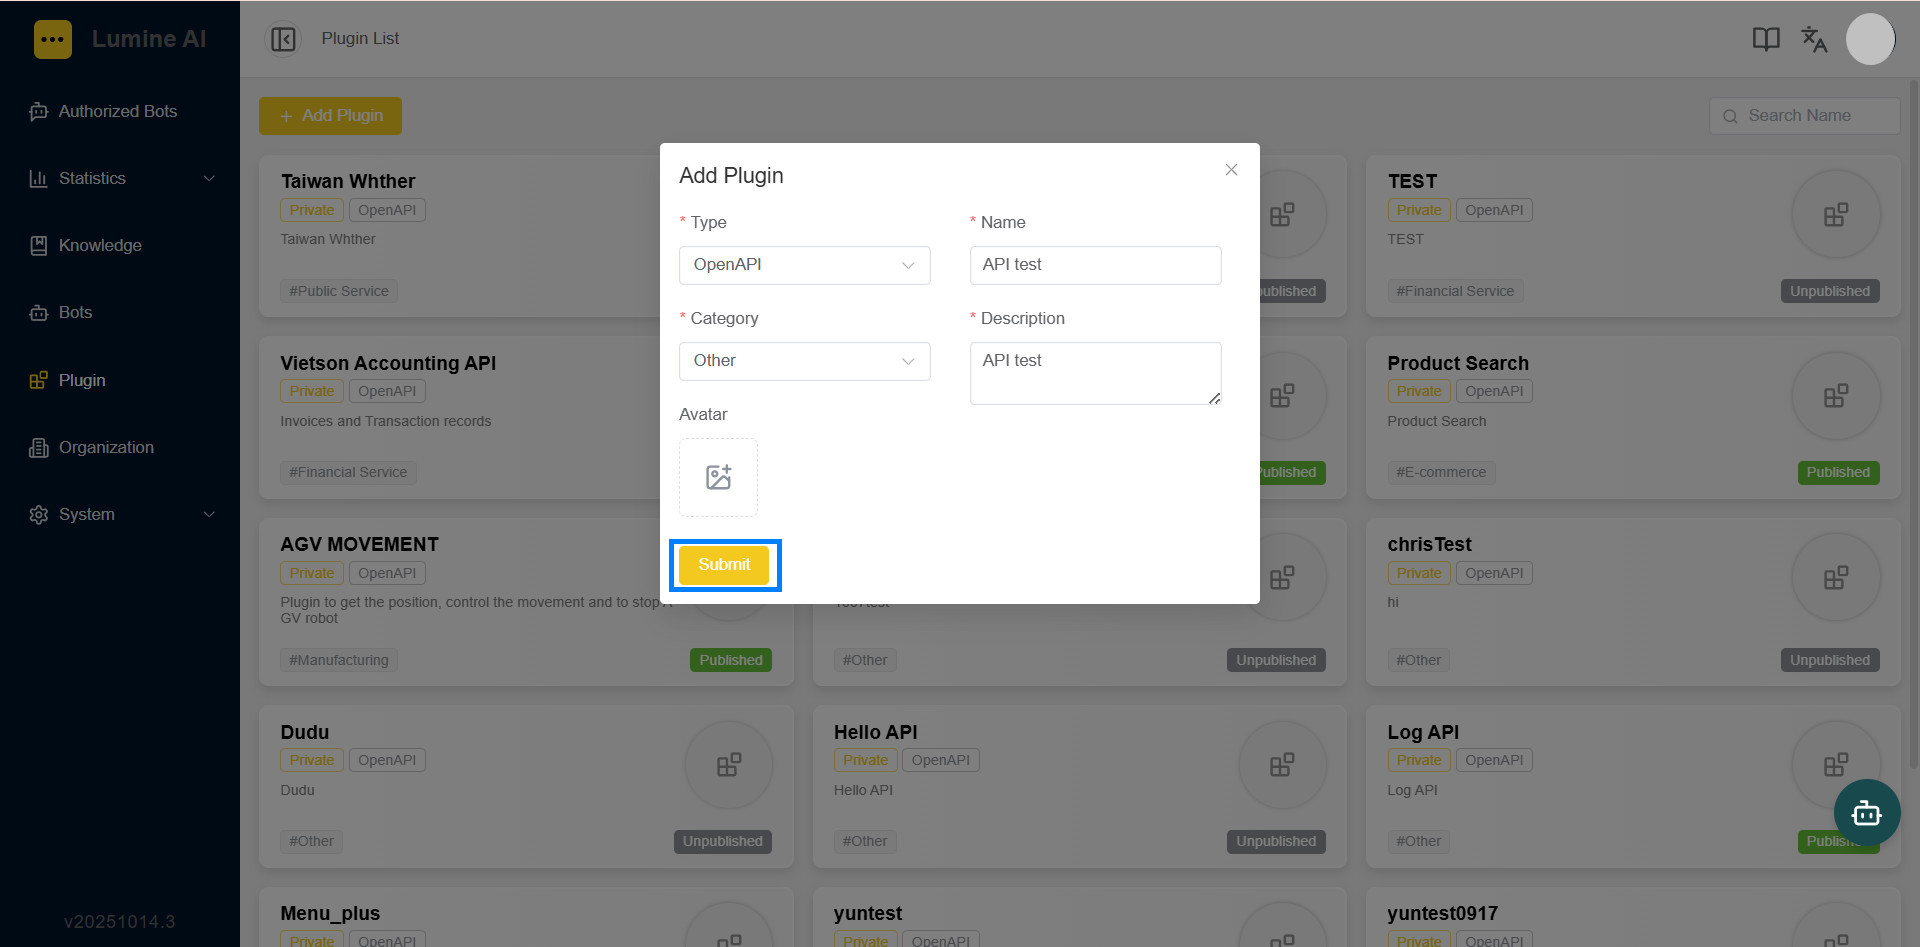
2. 在建立畫面中輸入插件名稱、描述(簡短說明插件的用途),並選擇適當的分類。完成設定後,點擊「送出」即可建立插件。
On the creation screen, enter the plugin name, description (briefly describing the plugin's purpose), and select the appropriate category. After completing the settings, click "Submit" to create the plugin.
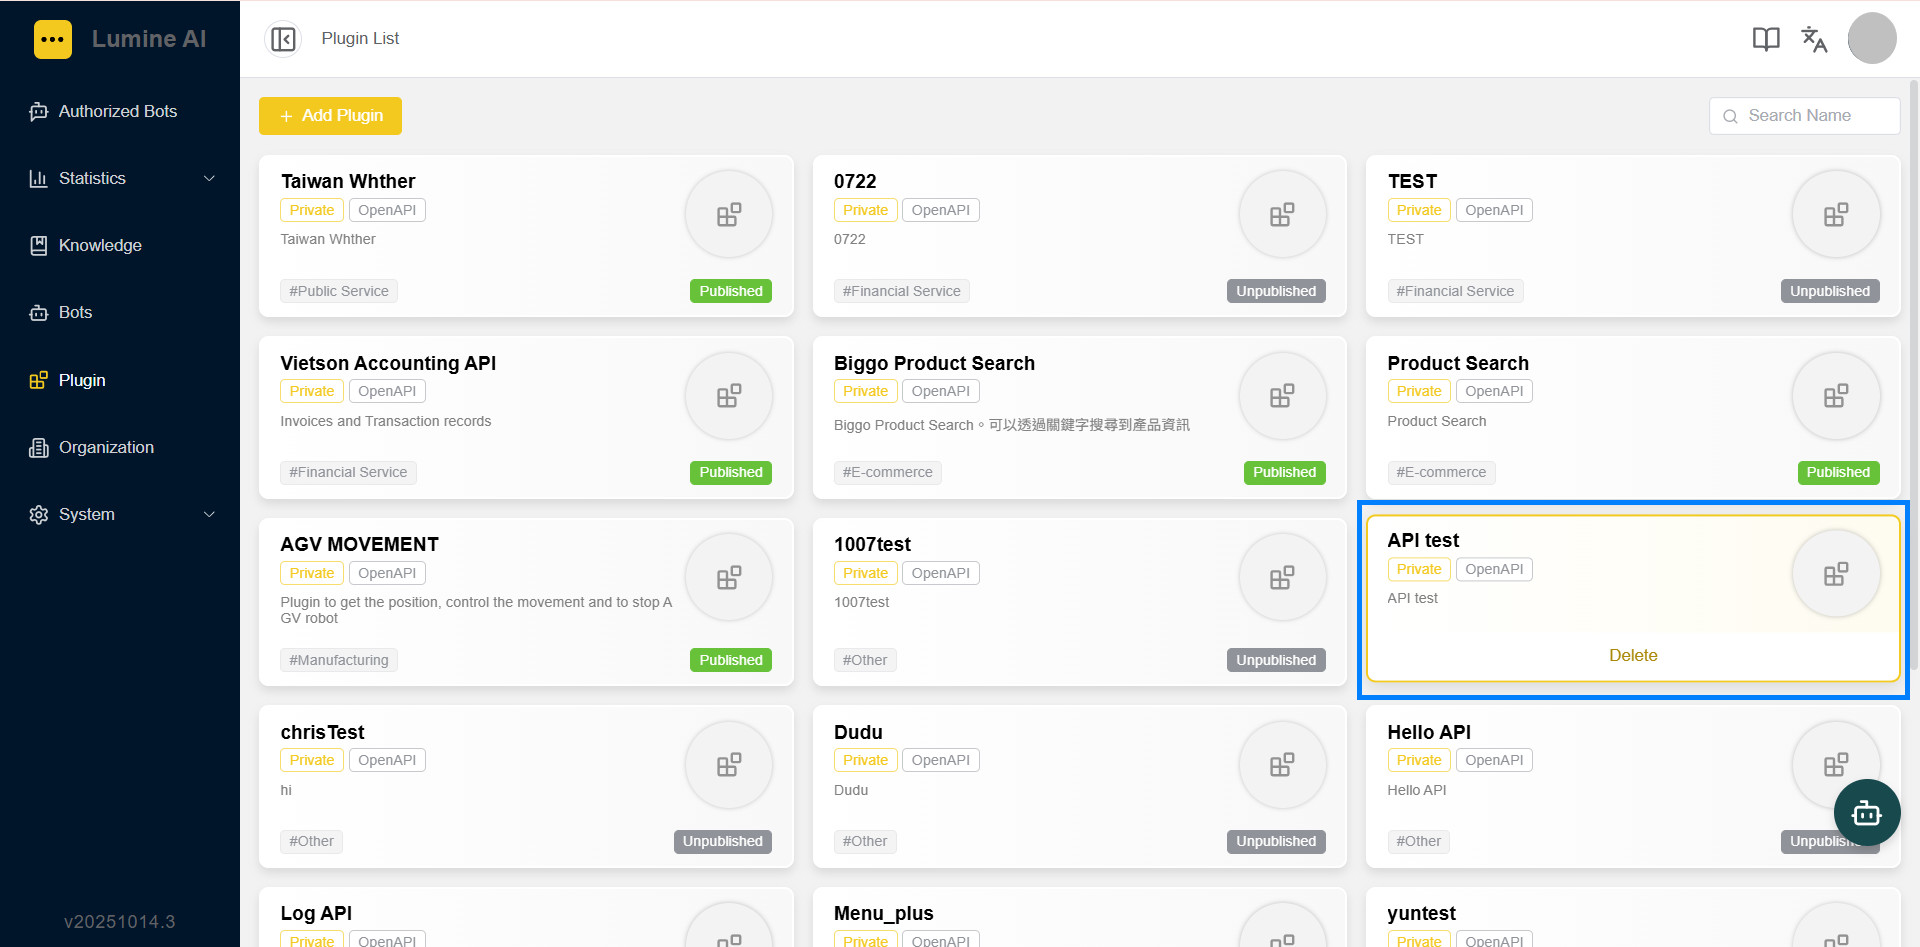
3. 建立完成後,點擊剛新增的插件卡片,即可進入詳細設定畫面,進行 API 相關設定作業。
After creation, click the newly added plugin card to enter the detailed settings screen and configure API-related settings.
B. API 設定與驗證 | API Configuration and Authentication
B-1. 設定 API 驗證(如有需要)| Set Up API Authentication (If Needed)
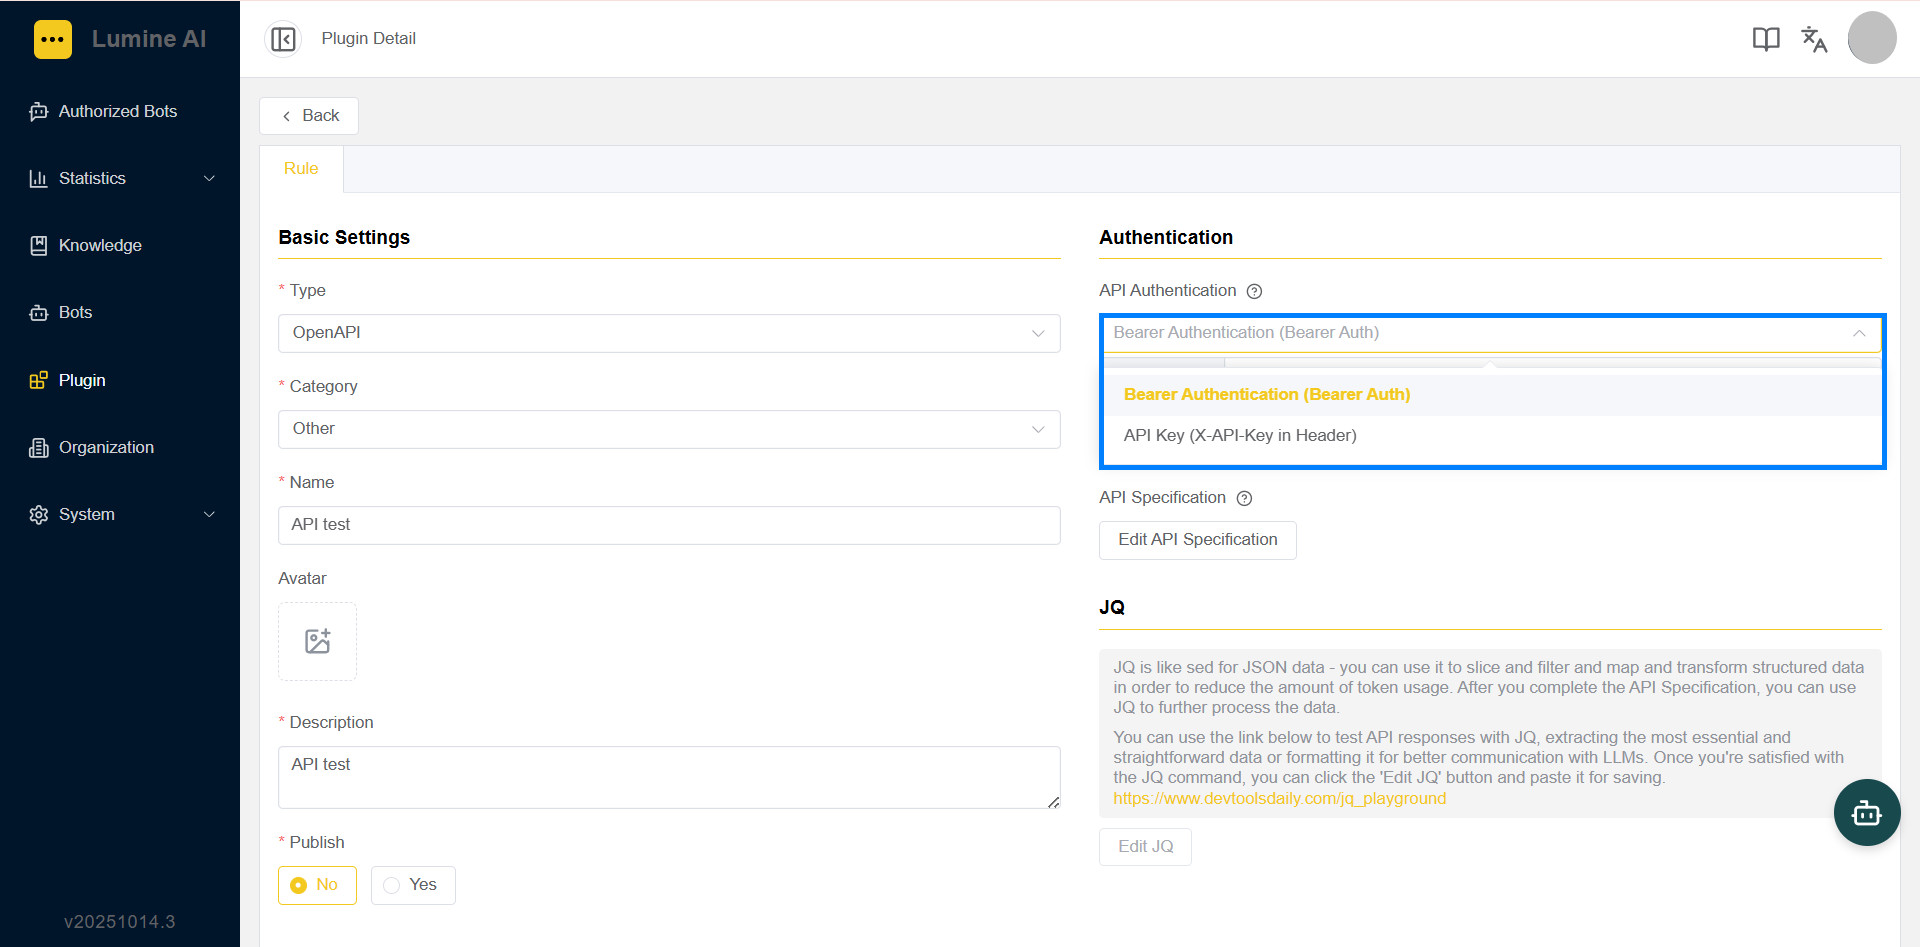
1. 若 API 服務需要身份驗證,在畫面中選擇對應的「API 驗證類型」。
If the API service requires authentication, select the corresponding "API Authentication Type" on the screen.
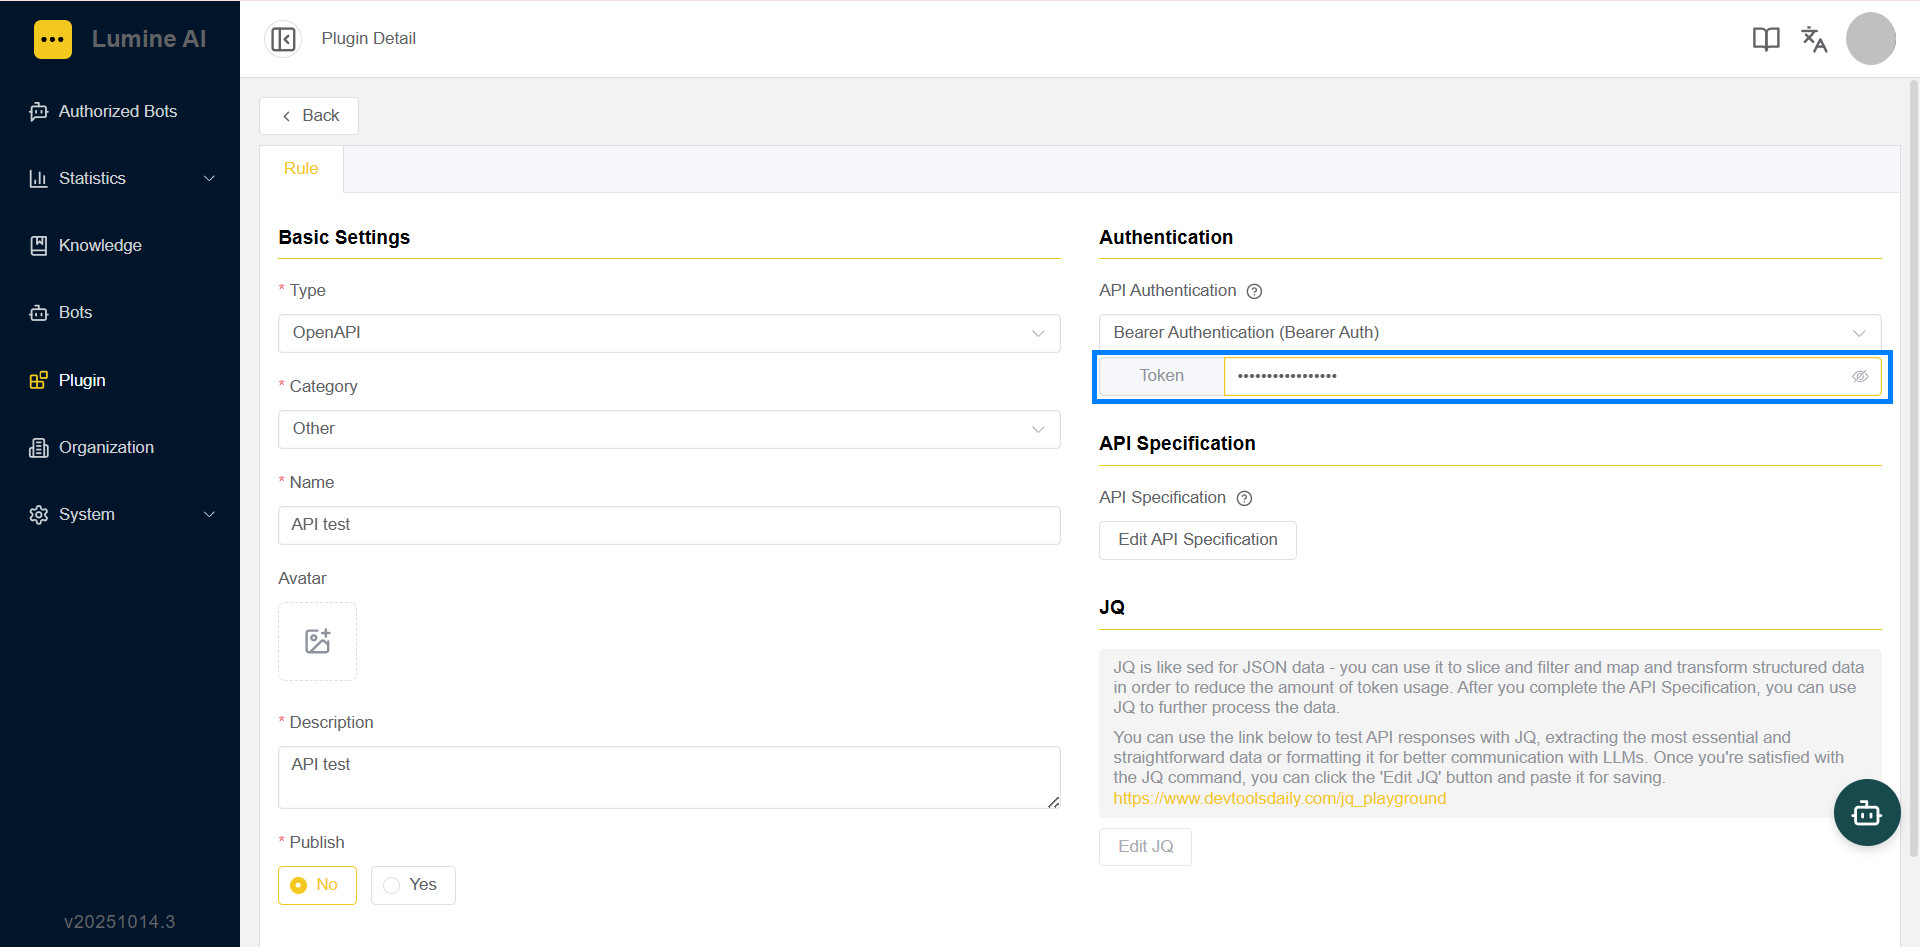
2. 填入服務提供的 Token。設定後系統在每次呼叫 API 時會自動帶入該驗證資訊。
Enter the Token provided by the service. After setting it, the system will automatically include this authentication information in every API call.
目前提供以下 API 驗證方式:
The following API authentication methods are currently provided:
| 驗證類型 | Authentication Type | 說明 | Description | 範例 | Example |
|---|---|---|
| Bearer Authentication (Bearer Auth) | 最常見的 Token 驗證方式,於 Header 中加入 Authorization: Bearer The most common Token authentication method, adding Authorization: Bearer in the Header. |
Authorization: Bearer abcdef123456 |
| API Key (X-API-Key in Header) | 使用自訂的 API 金鑰作為驗證,於 Header 中加入 X-API-Key Use a custom API key for authentication by adding X-API-Key in the Header. |
X-API-Key: api-key-001 |
B-2. 編輯 API 規格 | Edit API Specification
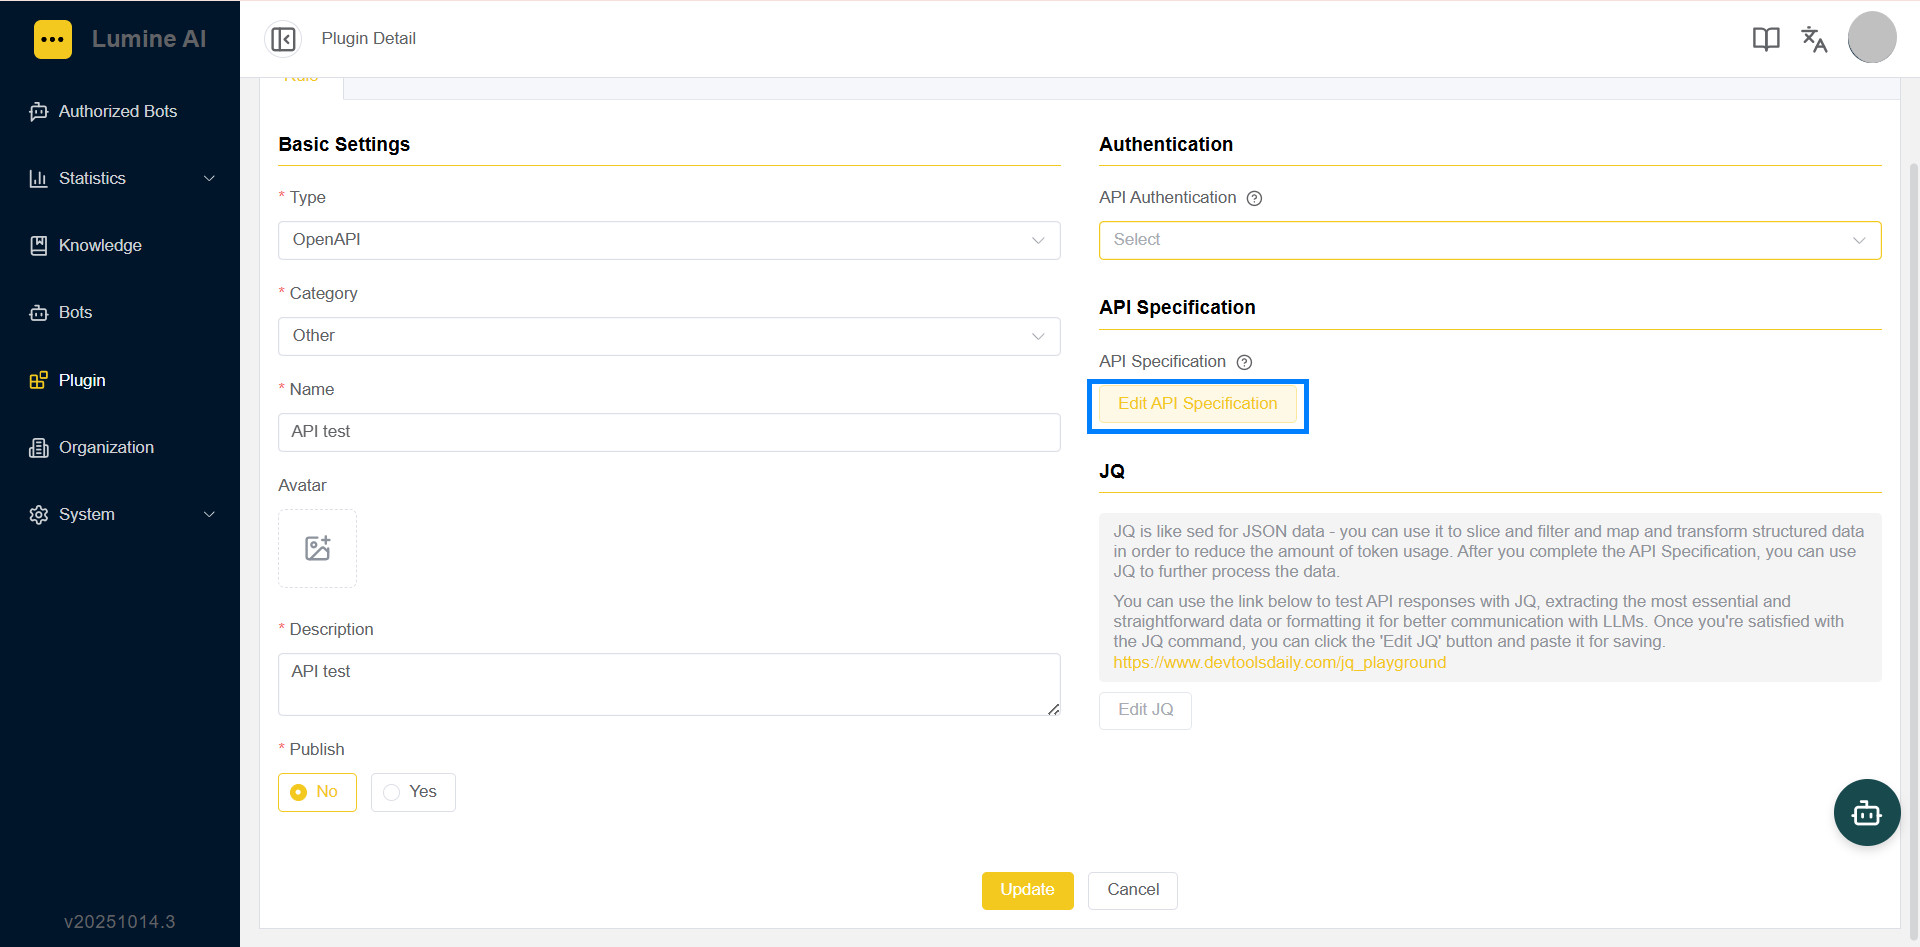
1. 點擊「編輯 API 規格」進入 OpenAPI 編輯畫面。
Click "Edit API Specification" to enter the OpenAPI editing screen.
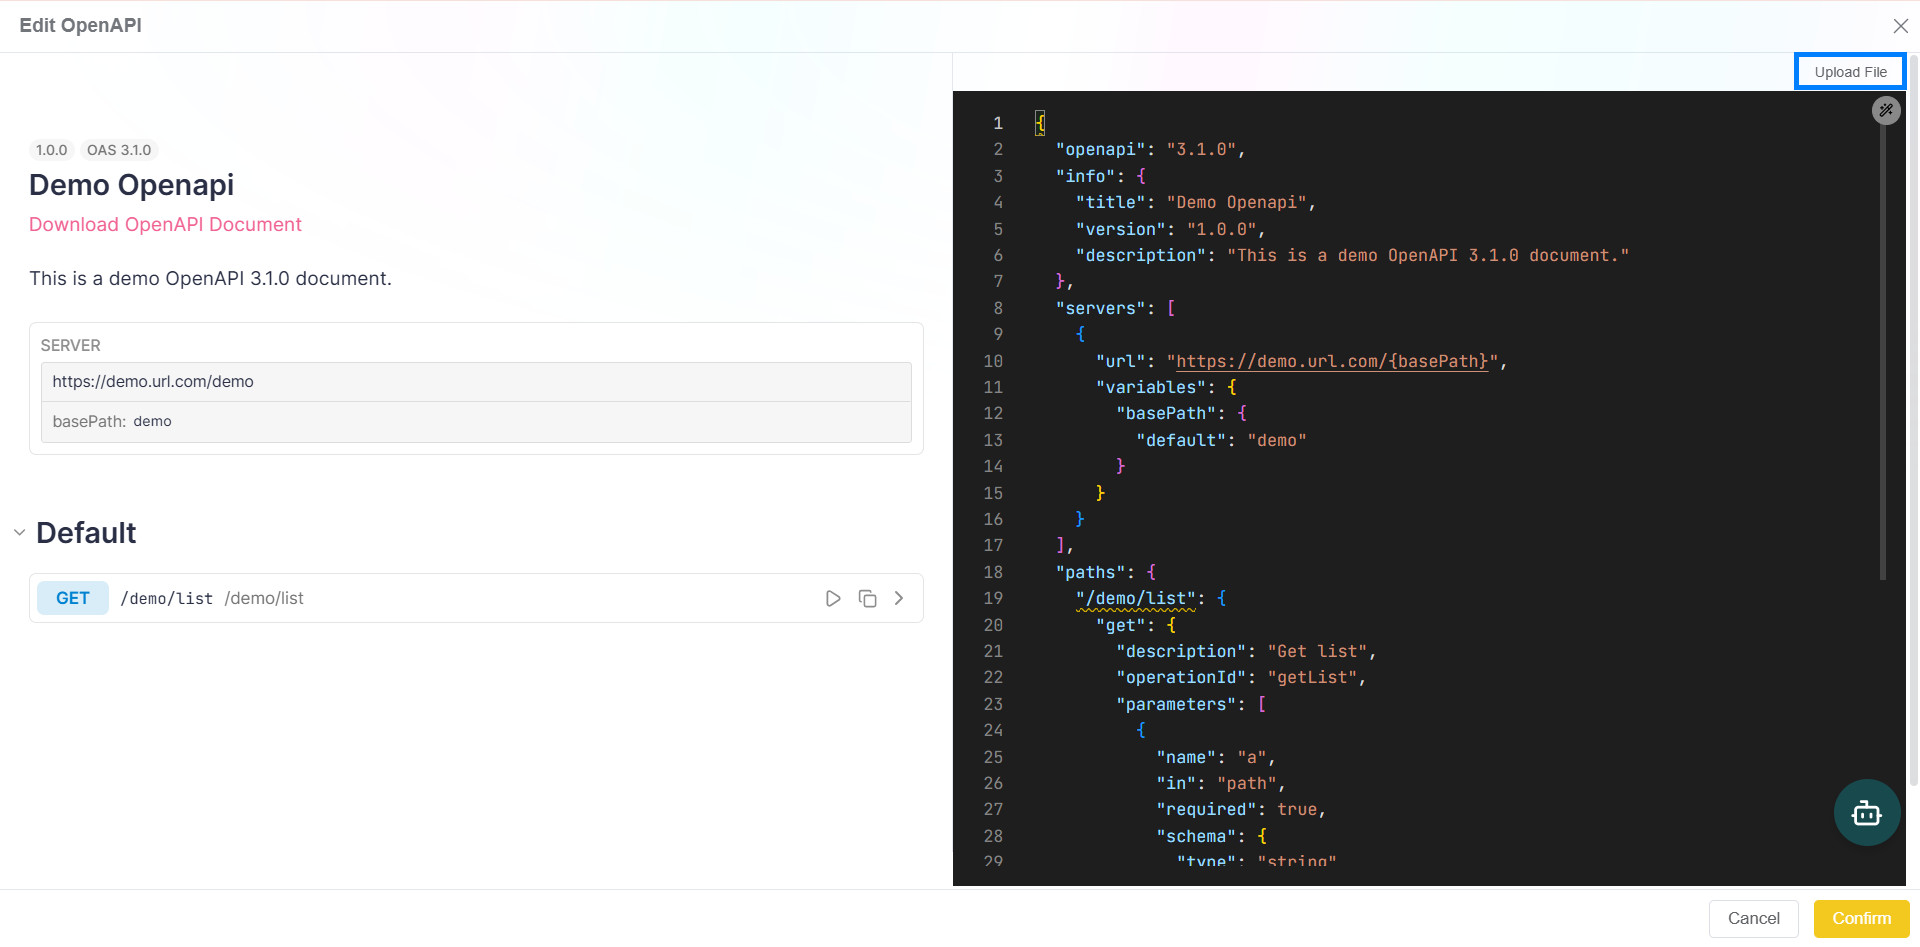
2. 在右側的程式編輯器可貼上串接服務的 API 文件內容,或在右上角點擊上傳檔案匯入 JSON 檔案。
In the code editor on the right, you can paste the API documentation content for the service, or click the upload button at the top right to import a JSON file.
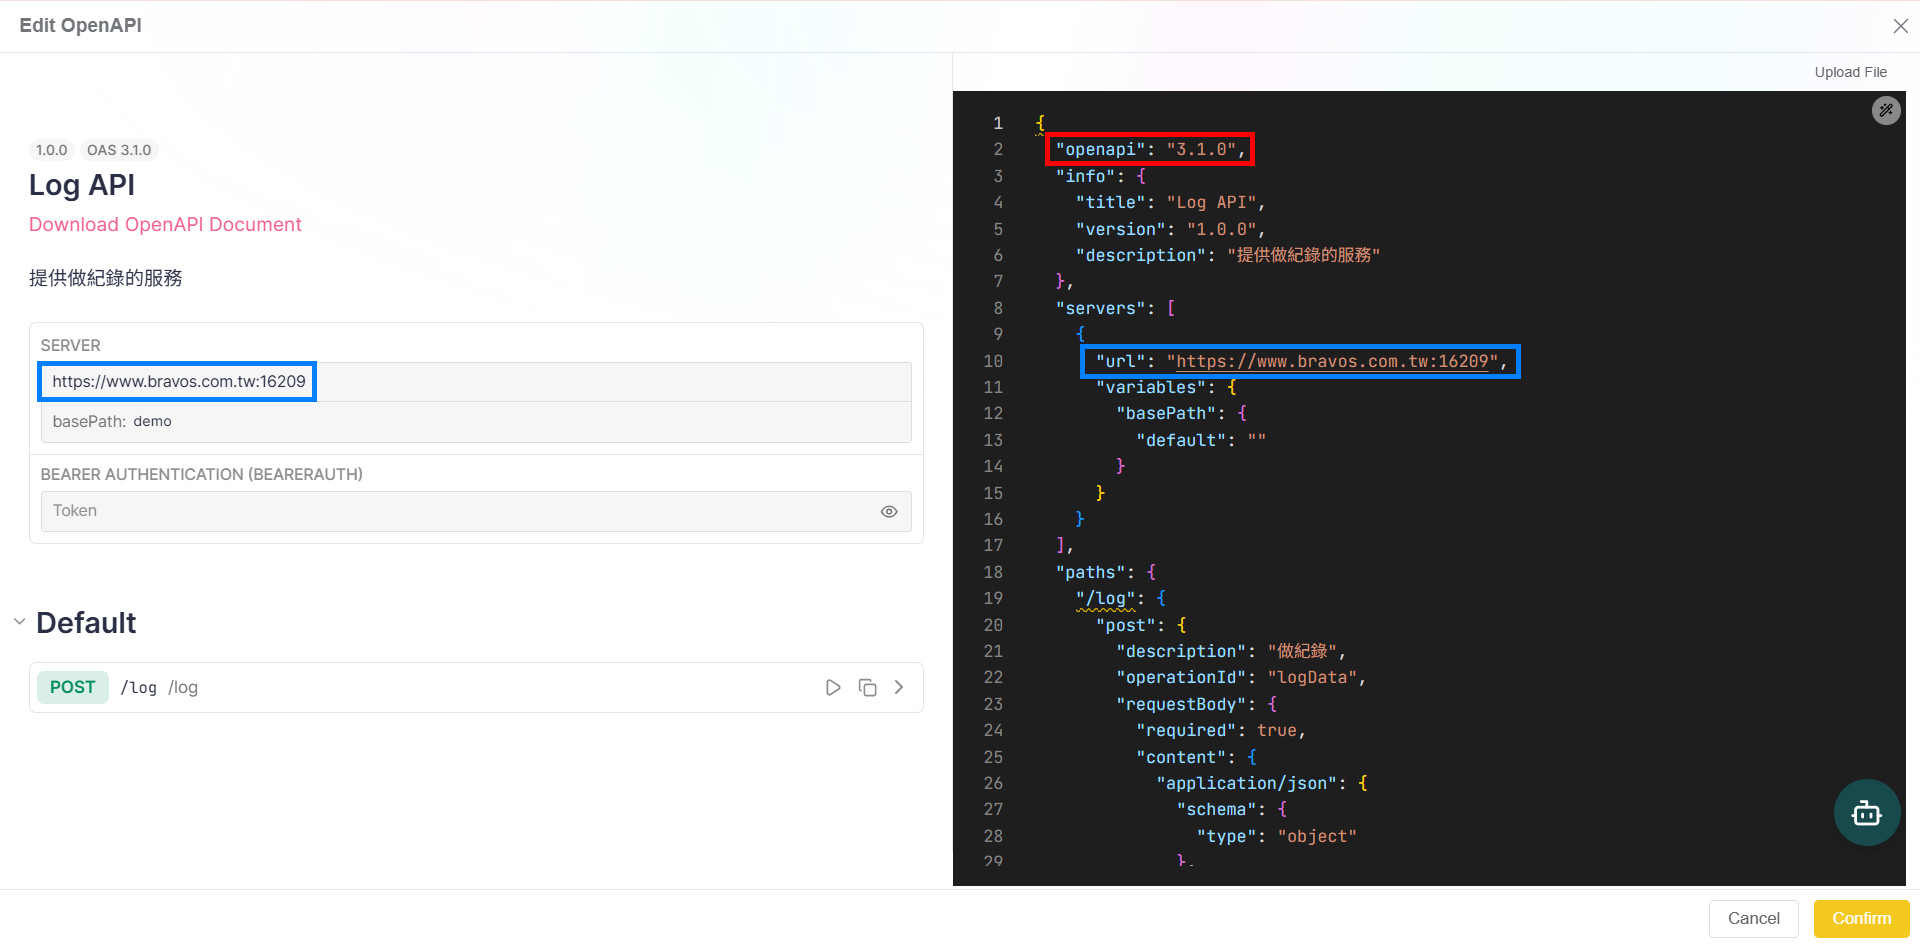
3. 請注意: OpenAPI 版本需為 3.1.0。
Note: The OpenAPI version must be 3.1.0.
4. 貼上或上傳 API 後,系統會自動解析並於左側帶入 Server URL,可確認路徑是否正確。
After pasting or uploading the API, the system will automatically parse it and populate the Server URL on the left side, allowing you to verify if the paths are correct.
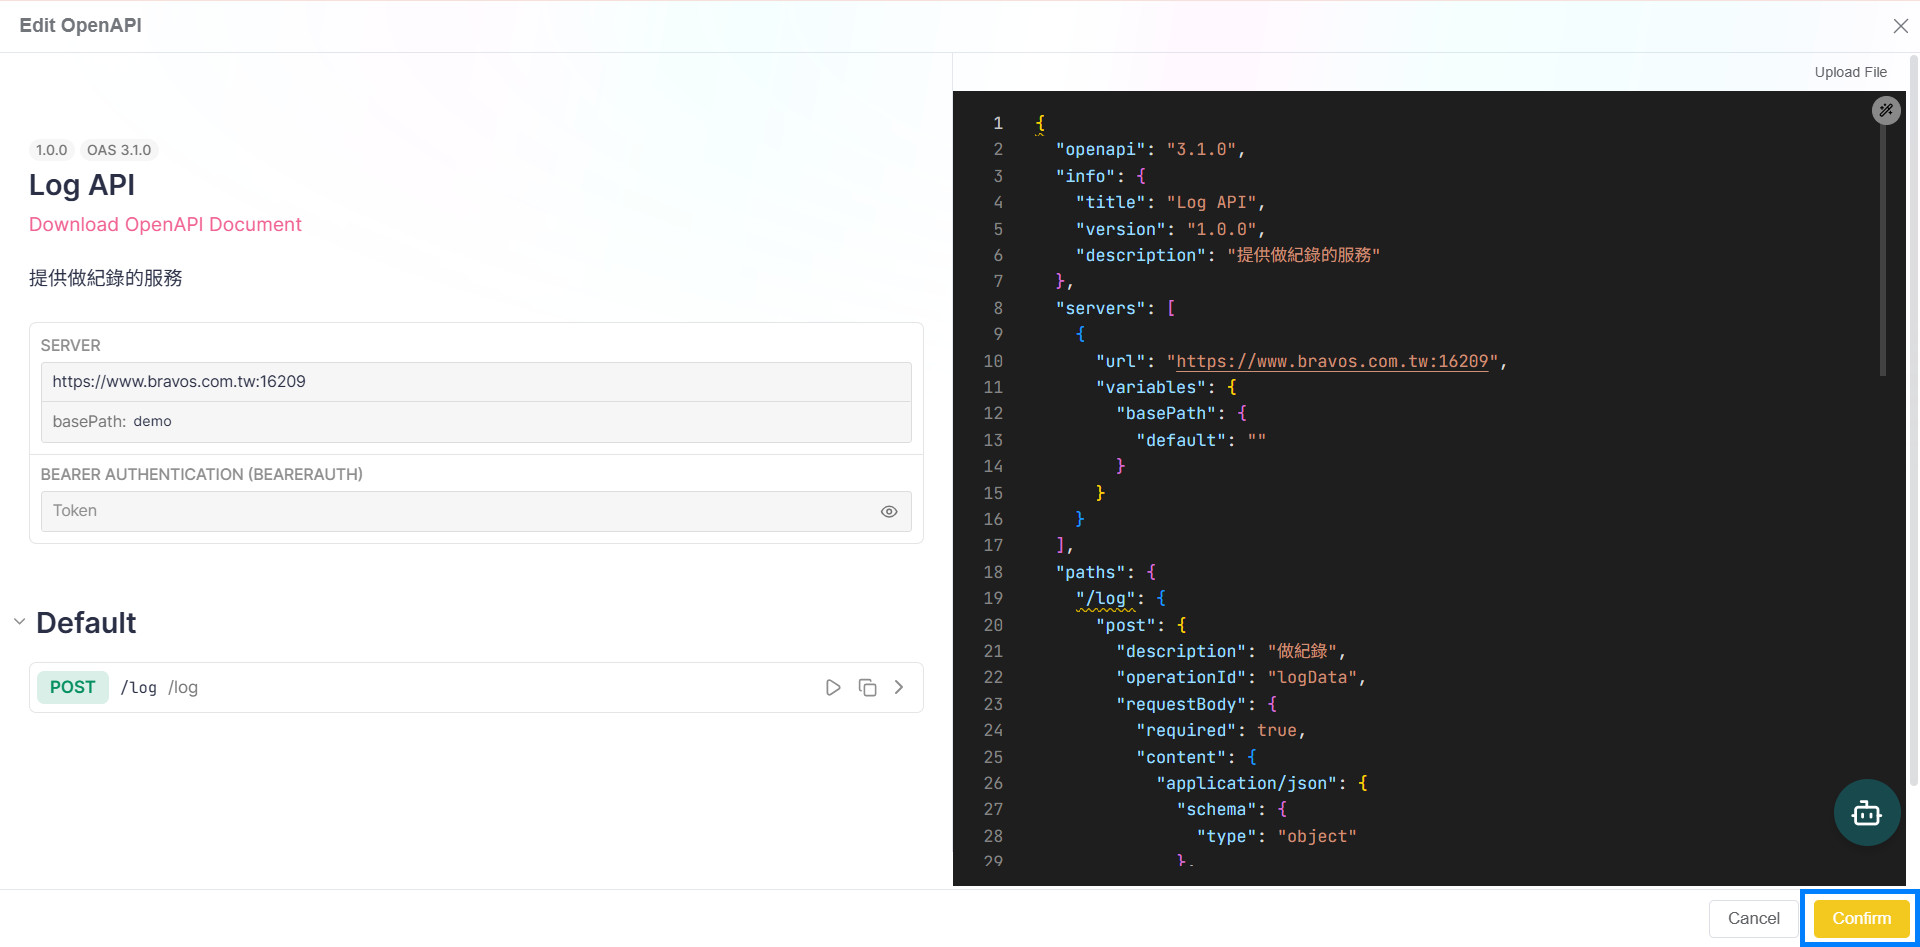
5. 確認設定無誤後,點擊「確認」按鈕以儲存 API 規格,系統將自動關閉 API 編輯畫面。
After confirming the settings are correct, click the "Confirm" button to save the API specification. The system will automatically close the API editing screen.
B-3. 設定 JQ 規則(如有需要) | Set JQ Rules (If Needed)
JQ說明:
JQ 是一種輕量級的 JSON 資料處理工具,可用於:
• 選取特定欄位
• 過濾不需要的資料
• 轉換或重組 JSON 結構
在此插件系統中,JQ 主要用於處理 API 回傳結果,達到「資料瘦身」與「重組輸出」的目的。
JQ Description:
JQ is a lightweight JSON data processing tool that can be used to:
• Select specific fields
• Filter unnecessary data
• Transform or restructure JSON data
In this plugin system, JQ is mainly used to process API responses, achieving "data slimming" and "restructured output".
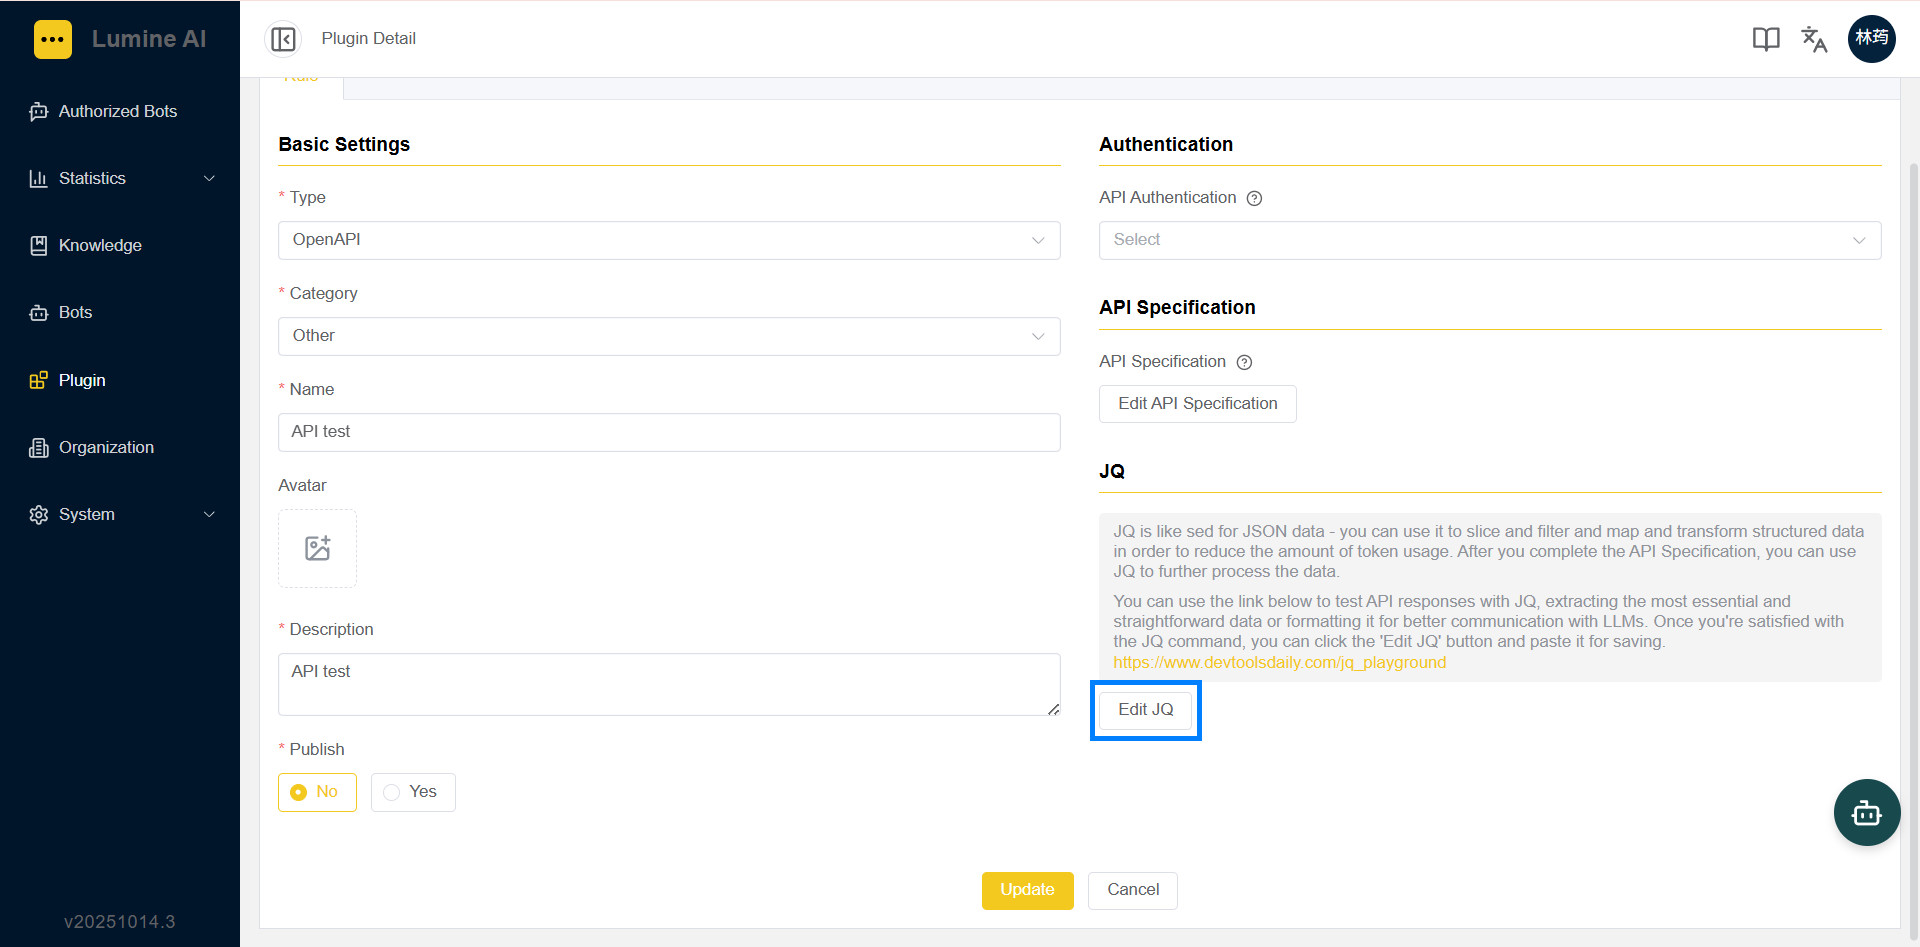
1. 若希望針對 API 回傳資料進行精簡處理,可點擊「編輯 JQ」按鈕。
If you want to streamline the data returned by the API, click the "Edit JQ" button.
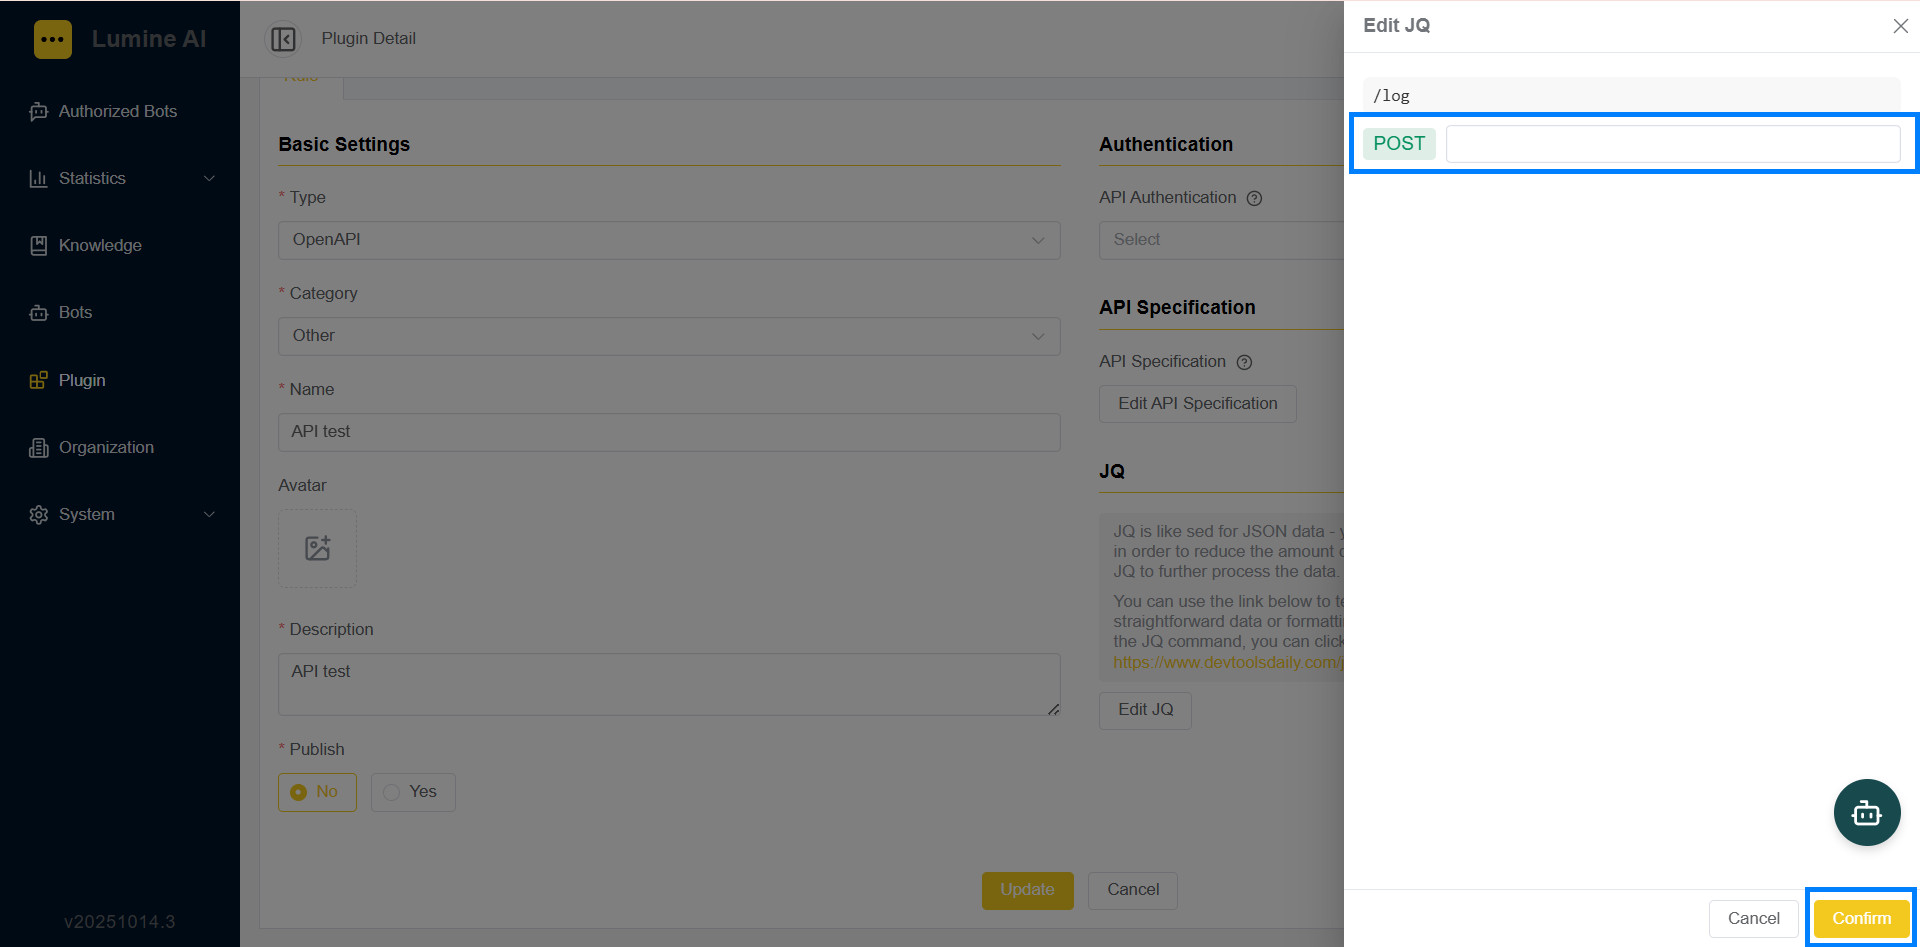
2. 於右側輸入框中填入欲套用的 JQ 處理語法,用以過濾或重組 API 回傳的 JSON 資料。
Enter the JQ processing syntax you want to apply in the input box on the right to filter or restructure the JSON data returned by the API.
3. 完成設定後,點擊右下角的送出按鈕儲存變更。
After completing the settings, click the "Submit" button at the bottom right to save the changes.
C. 插件綁定與啟用 | Plugin Binding and Activation
C-1. 發布插件 | Publish the Plugin
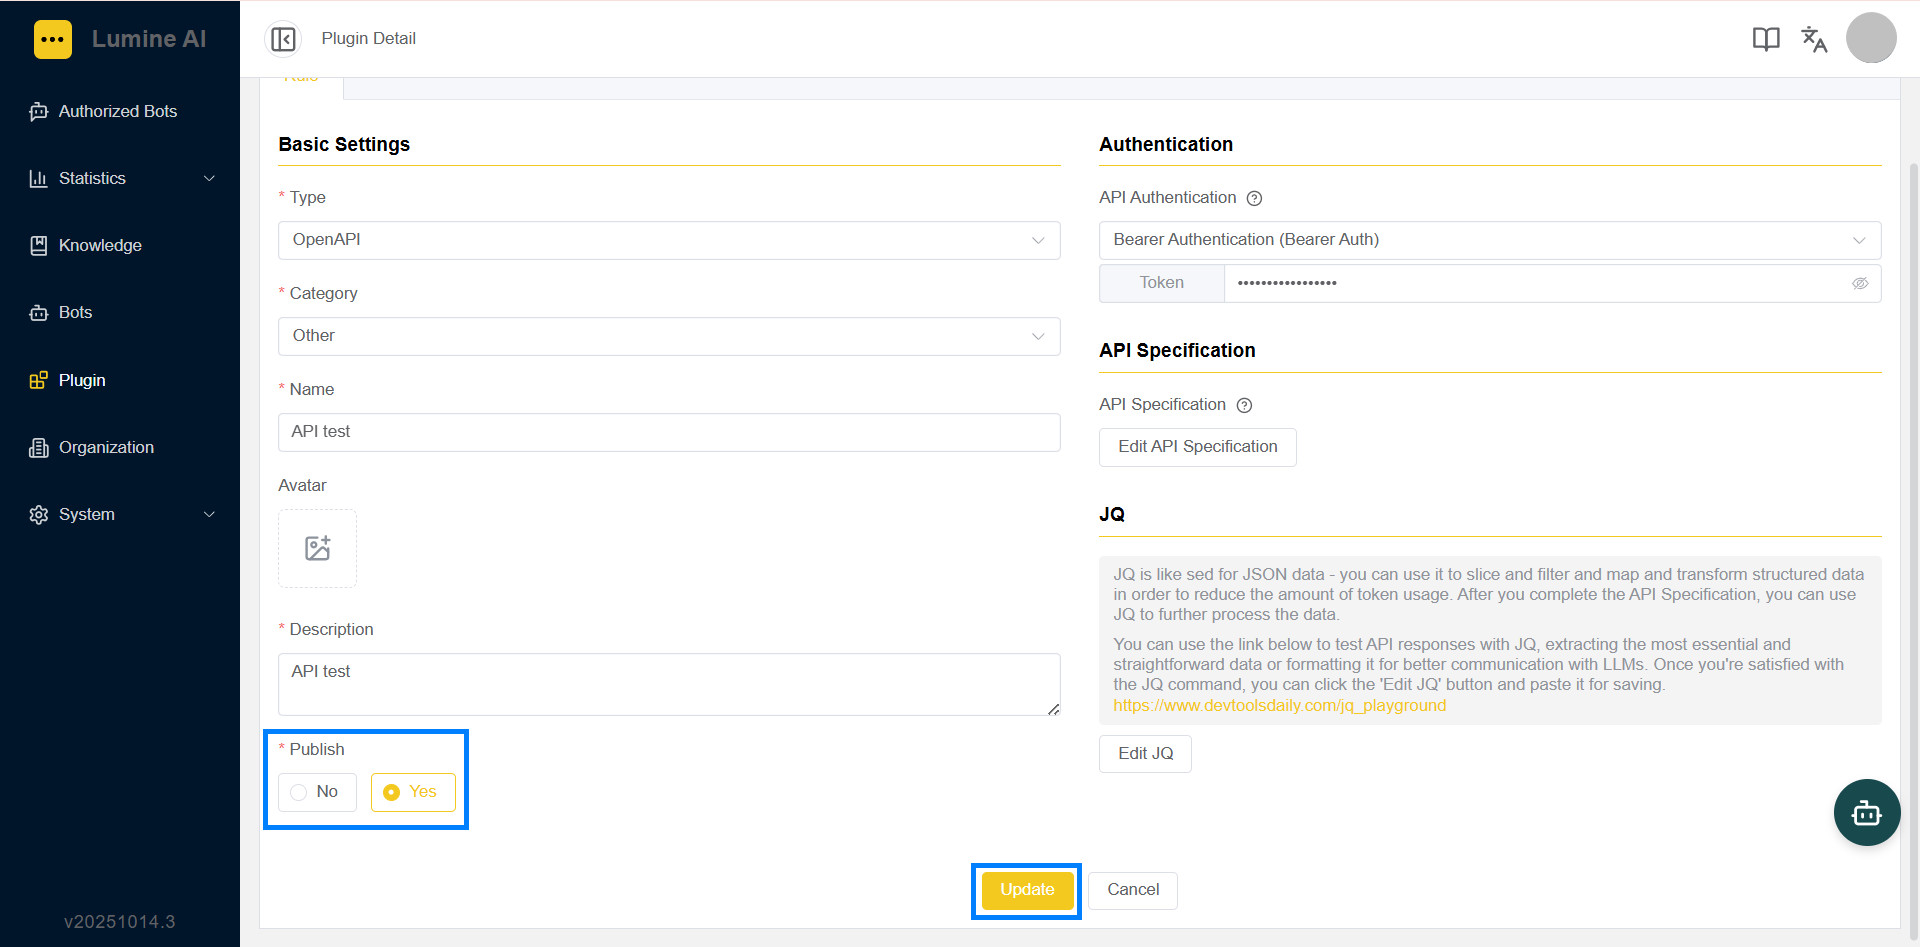
1. 完成 API 設定後,在插件設定畫面中,於「發布」欄位勾選「是」,並點擊「更新」。此步驟將啟用該插件,讓機器人可以綁定並使用。
After completing the API settings, in the plugin settings screen, check "Yes" under the "Publish" field and click "Update." This step will activate the plugin, allowing the bot to bind and use it.
C-2. 將插件綁定至機器人 | Bind the Plugin to the Bot
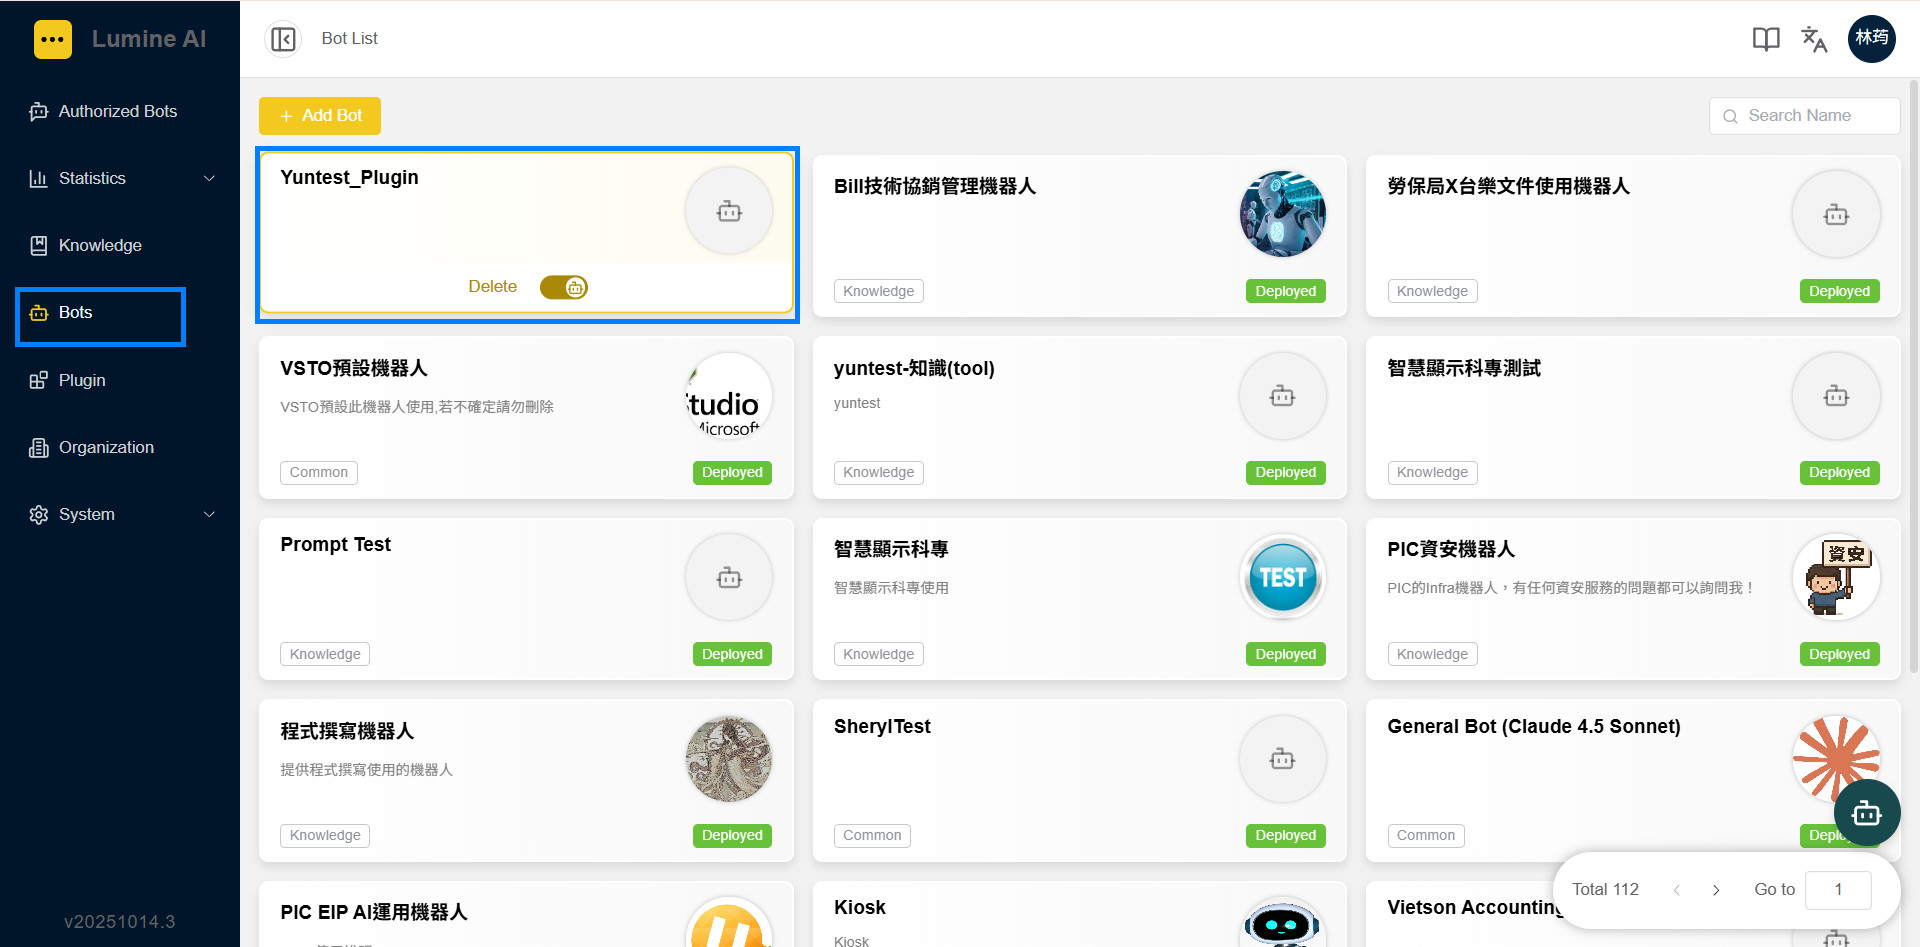
1. 進入「機器人管理介面」。
Enter the "Bots" Interface.
2. 點擊要使用插件的機器人卡片,進入編輯畫面。
Click the robot card you want to use the plugin with to enter the editing screen.
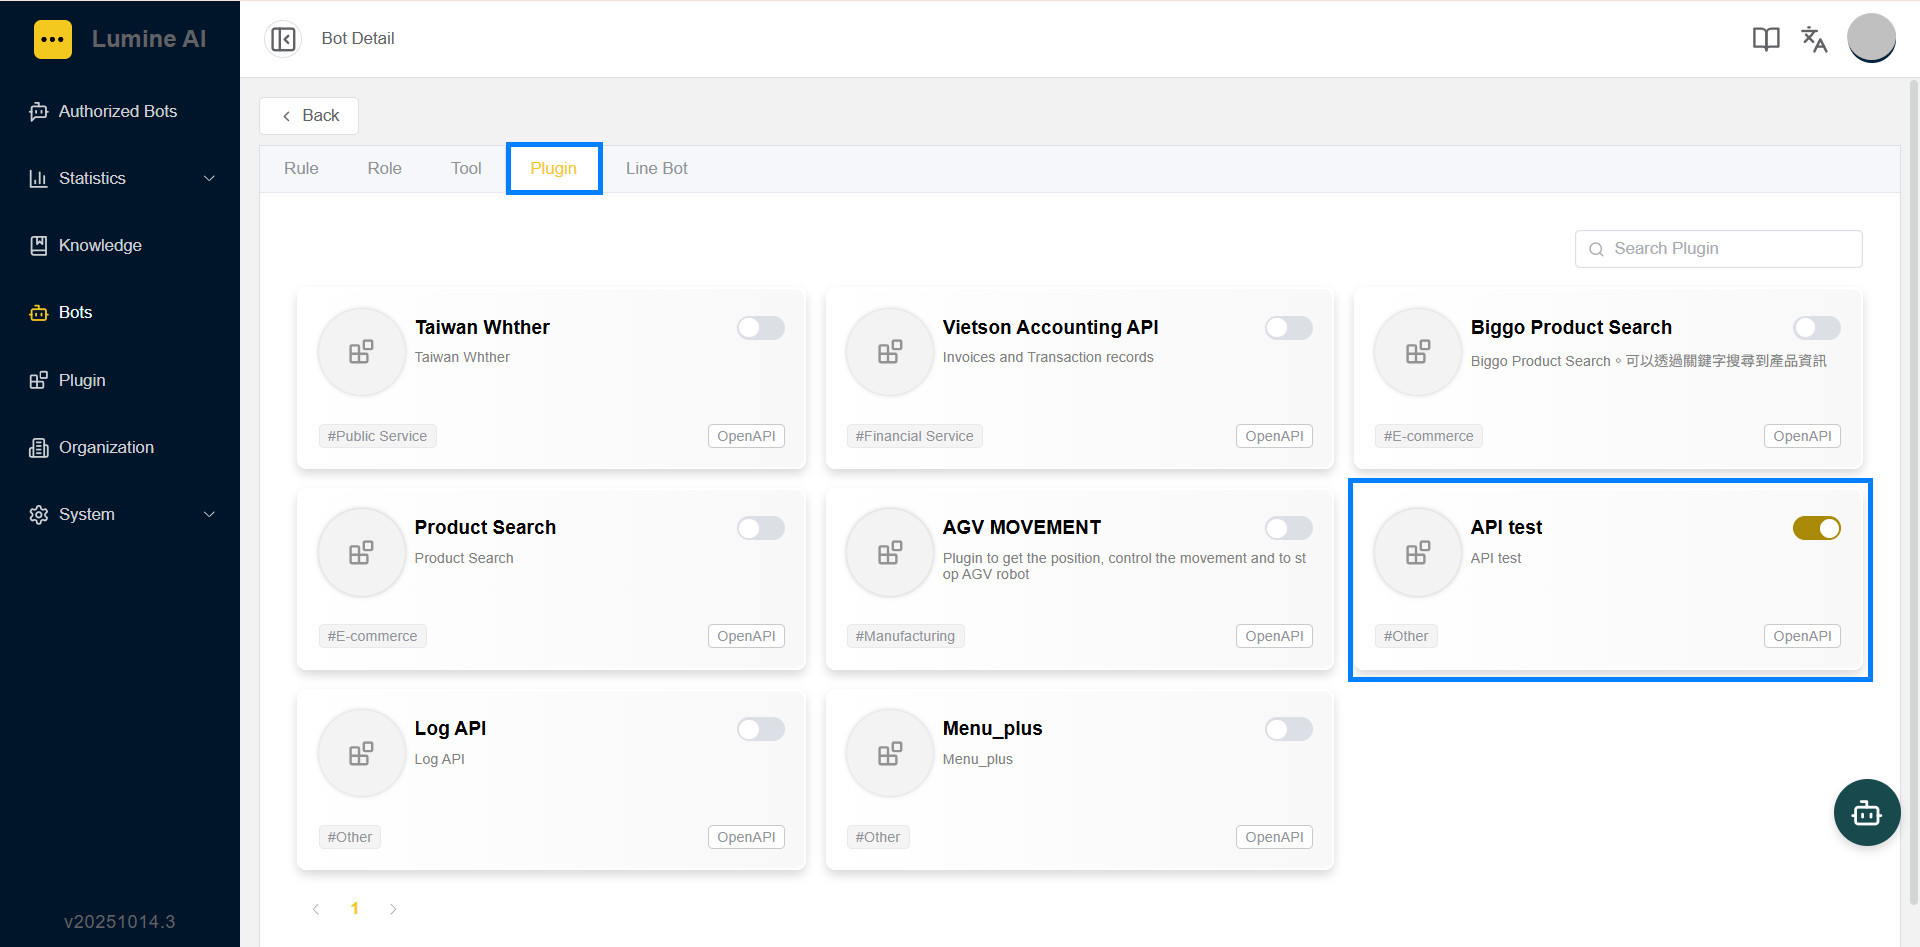
3. 點擊「插件」頁籤,啟用想要綁定的插件。
Click the "Plugin" tab to enable the plugin you want to bind.
4. 綁定限制:一個機器人只能綁定一個插件,如需更換綁定的插件,請先將原插件關閉後,再啟用新的插件。
Binding restrictions: A robot can only bind to one plugin. To switch to a different plugin, first disable the current plugin, then enable the new one.
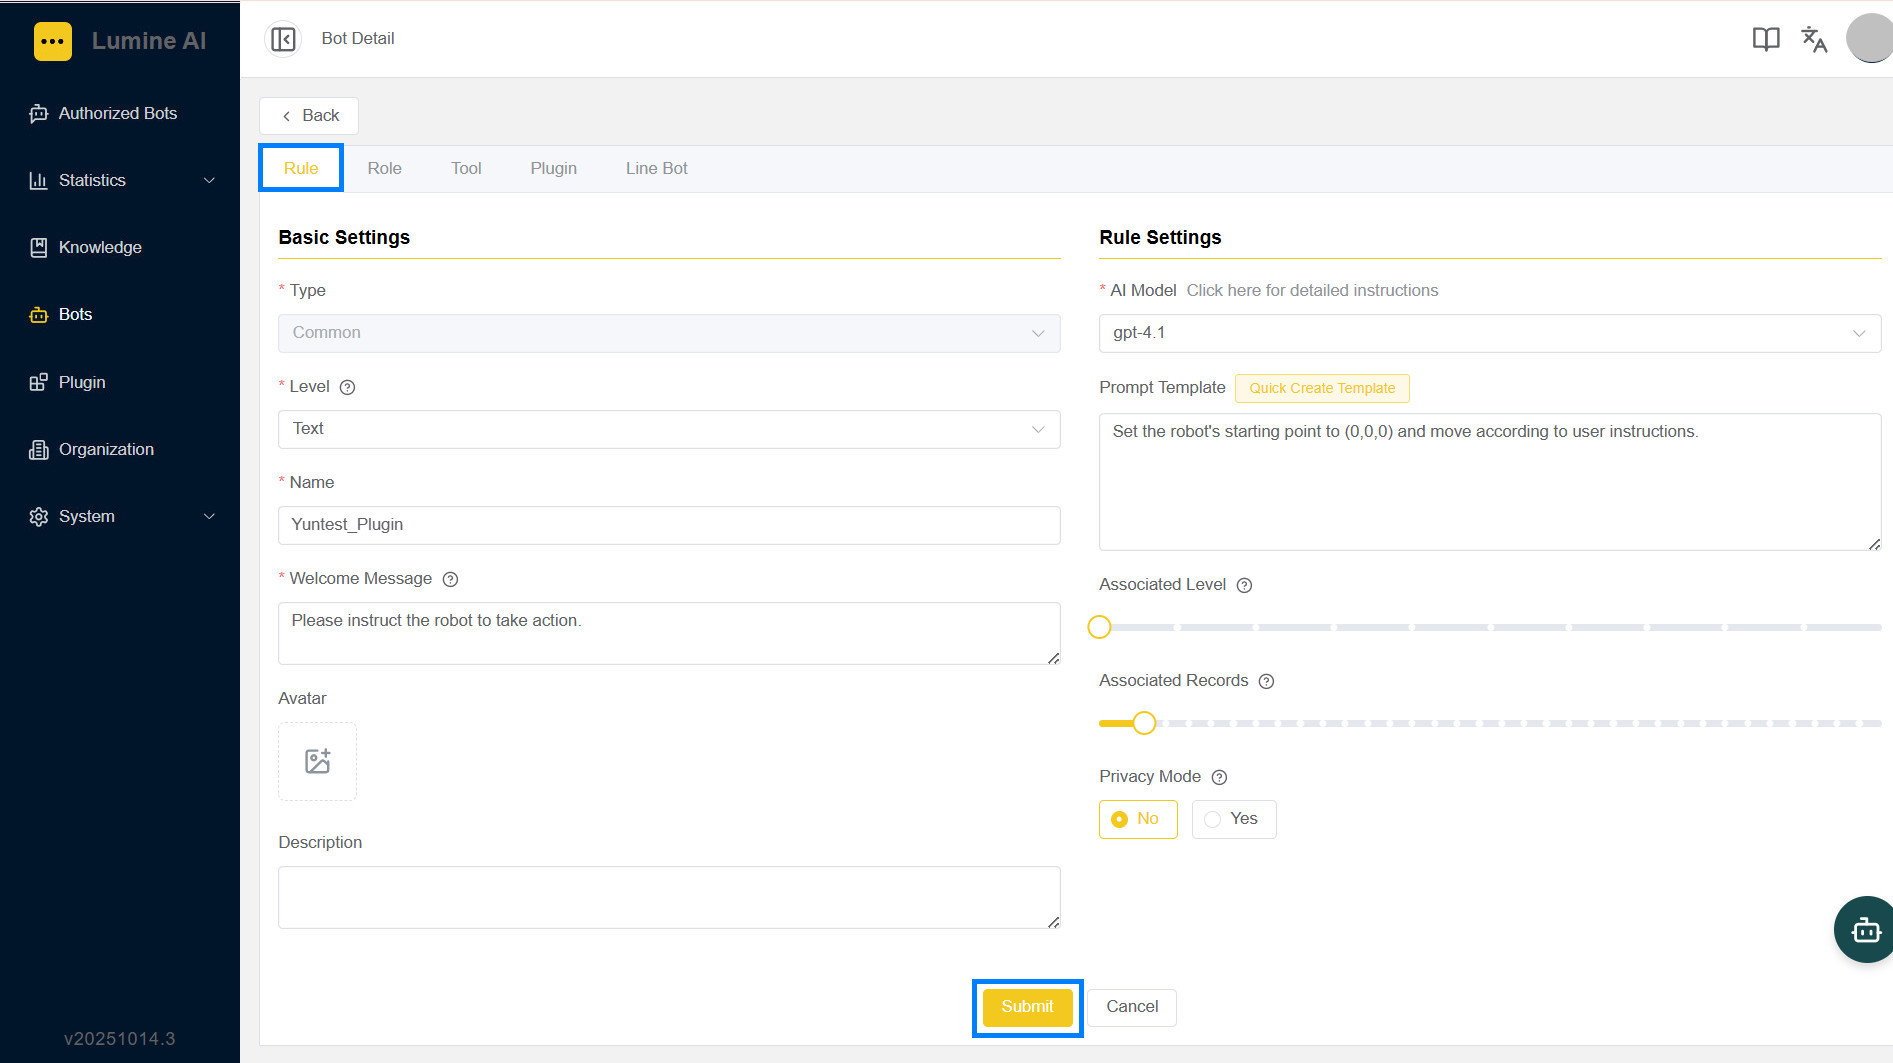
6. 請注意: 啟用插件後,需回到「基本設定」頁面點擊「送出」,才能完成綁定。
Note: After enabling the plugin, you must return to the "Rule" page and click "Submit" to complete the binding.
C-3. 啟用機器人 | Activate the Bot
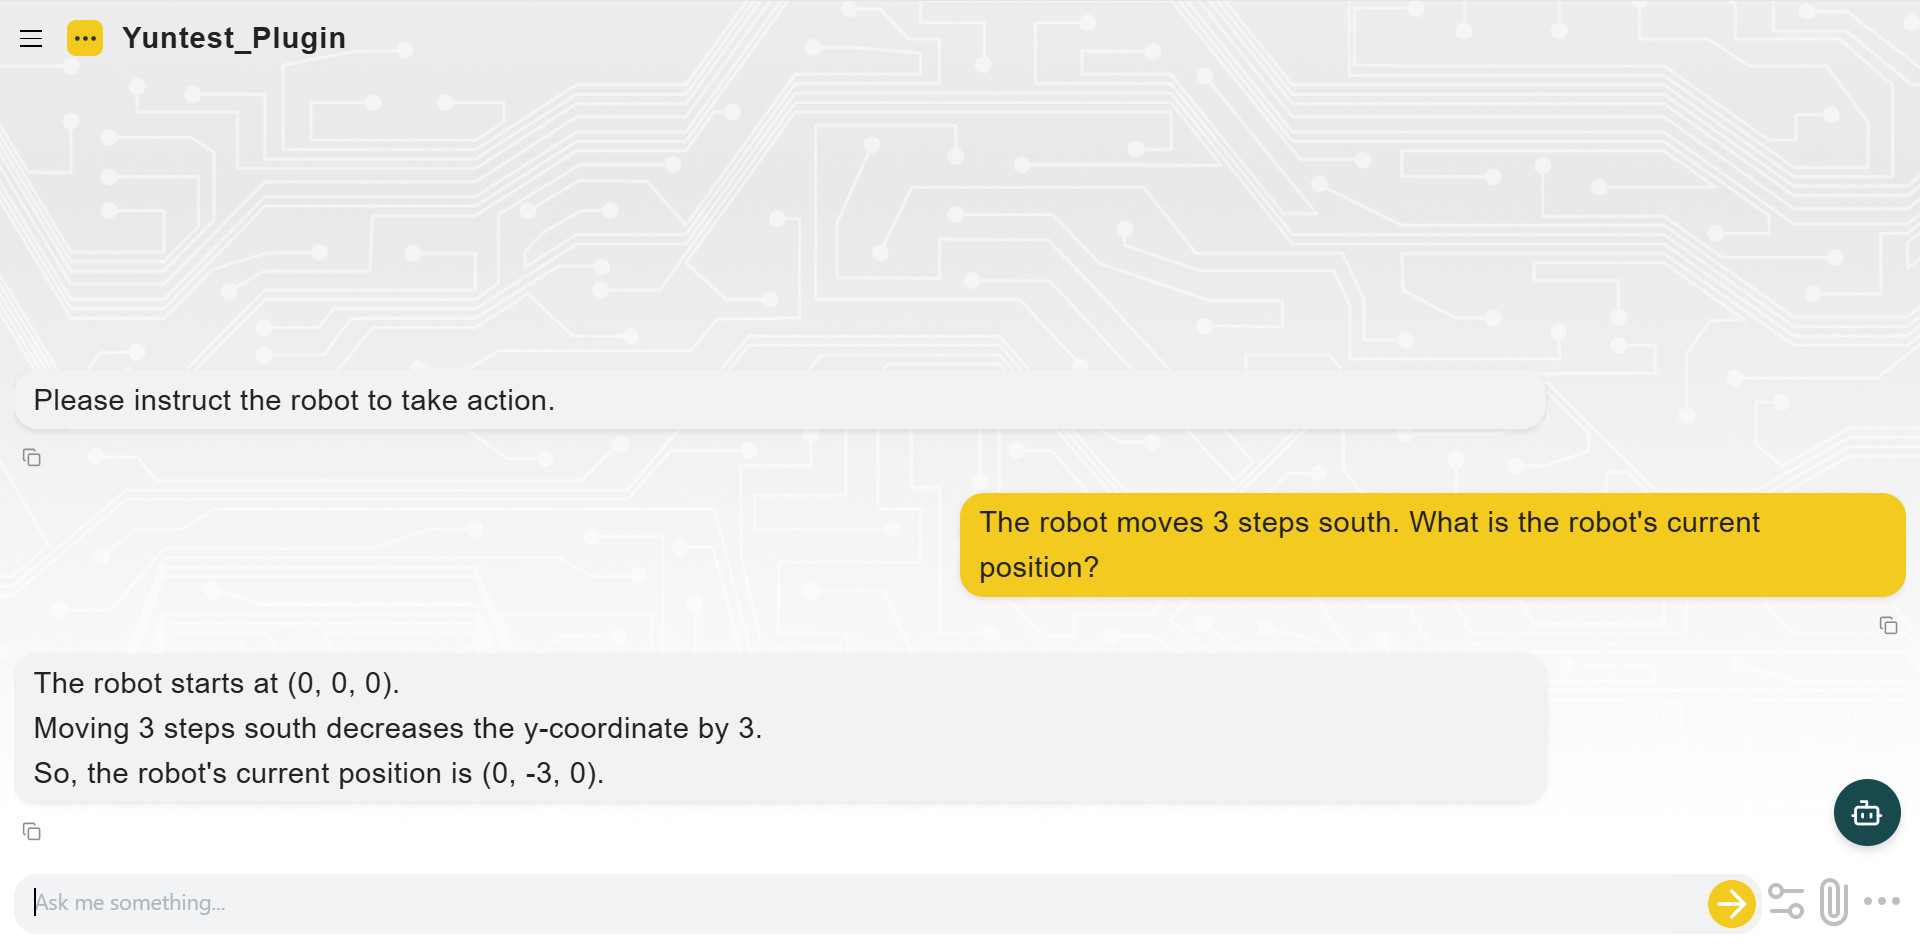
注意事項 | Notes
• 上傳之 OpenAPI 文件版本需為 3.1.0,否則系統將無法辨識。
• The uploaded OpenAPI file must be version 3.1.0, otherwise the system will not recognize it.
• 若 API 涉及授權,請妥善保存 Token,避免洩漏。
• If the API involves authorization, securely store the Token to prevent leakage.
• JQ 規則錯誤可能導致資料無法正確顯示,建議先於線上 JQ 測試工具驗證語法。
• Errors in JQ rules may cause data to display incorrectly; it is recommended to validate the syntax using an online JQ testing tool first.
• 啟用插件後務必記得回到機器人基本設定頁面點擊儲存,否則綁定不會生效。
• After enabling the plugin, be sure to return to the robot's basic settings page and click "Save," otherwise the binding will not take effect.